
The latest Creo 13 updates include hundreds of enhancements across modeling, assemblies, performance, and the user interface. But which Creo 13 updates are most likely to affect how engineers work every day? Check out the top enhancement tutorials below.
Creo 13 Tutorials
Creo 13 Tutorial: How to Use Creo AI Assistant
One of the most significant Creo 13 updates is the introduction of Creo AI Assistant, bringing AI-powered guidance directly into the design environment.
The initial capability focuses on “Advise”. Users can ask questions in natural language and receive instructions based on information from the Creo Help Center and PTC technical support resources. This means users can look up workflows or troubleshoot unfamiliar commands without leaving the Creo interface.
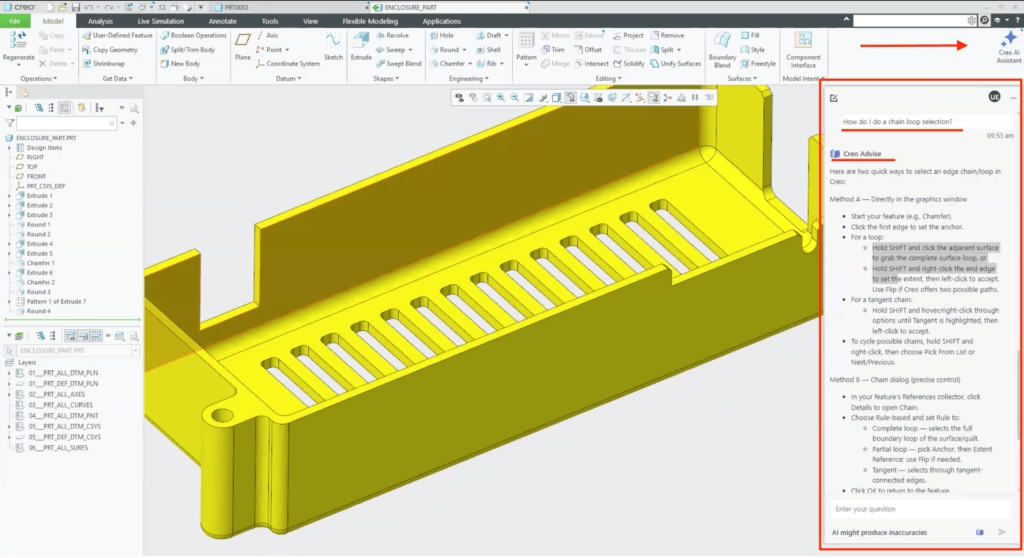
How to Use Creo AI Assistant:
- Open Creo 13 and select the ‘AI Assistant’ button in the upper right corner.
- Enter a question describing what you are trying to accomplish, such as how to create a box with an open side.
- Review and/or the step-by-step instructions provided by the assistant.
- Ask follow-up questions when you need clarification or more detail.
Creo AI Assistant puts Creo-specific assistance right where engineers need it: alongside the design workflow.
Creo 13 Tutorial: How to Diagnose Assembly Performance
Creo 13 also improves assembly interaction by reducing redundant feature regenerations. For engineers working with large or complex assemblies, that can translate into a more responsive modeling experience.
One of the most helpful Creo 13 updates is the enhanced Performance Report, which now includes regeneration time and retrieval time. Engineers can use that information to identify components, subassemblies, or features that may be contributing to slower performance.
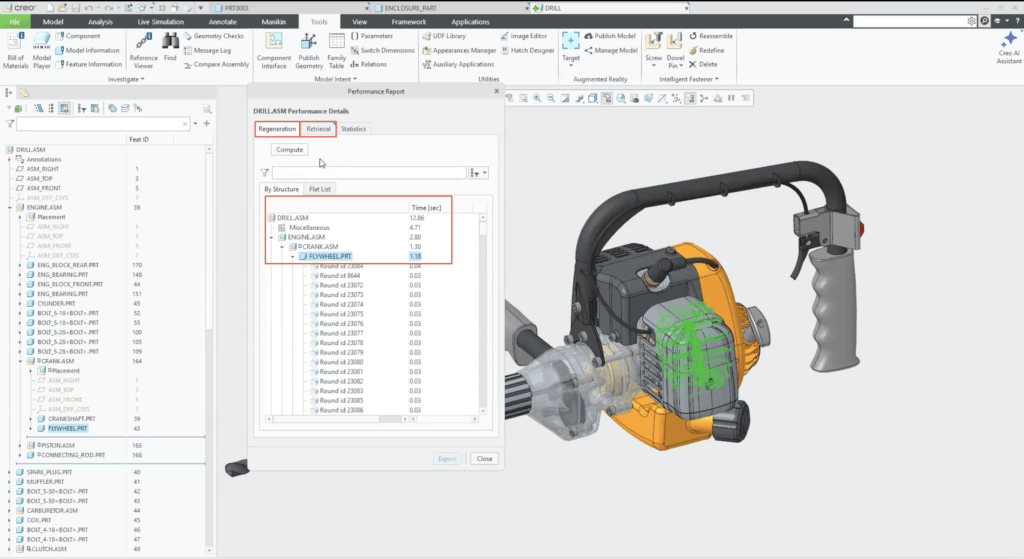
How to Run a Performance Report:
- Open the assembly you want to analyze.
- Navigate to Tools > Investigate > Performance Report.
- Select ‘Compute’ to analyze the assembly.
- Review regeneration and retrieval times, then drill down into slower components or features.
- Export the results to CSV for additional analysis.
The report also includes other statistics such as the number of components, unique models, etc. Creo 13 also adds the ability to stop a regeneration before it finishes, so you can return to other work and regenerate the model at a better time.
Creo 13 gives engineers exact time data, making it easier to find regeneration bottlenecks instead of guessing what is slowing down an assembly.
Creo 13 Tutorial: How to Turn Multi-Body Designs Into Assemblies Faster
Multi-body design makes it easier to build related geometry in a single Creo part, and the latest Creo 13 updates make it even easier to move those parts into the right assemblies.
The multi-body design features introduced in Creo 7 let you take Cradle Part files and break them into pieces. You can then use these pieces to drive iterations of each other, allowing you to remove parts or take intersections with other parts. This is particularly helpful for master modeling because you can create all parts and bodies in relation to each other, ensuring they all fit correctly within one part file.
Previously, engineers had to take an extra step and convert each body into an individual part, then reassemble it into an existing assembly. The updated workflow automates this process so you can create those parts and place them directly into an existing assembly.
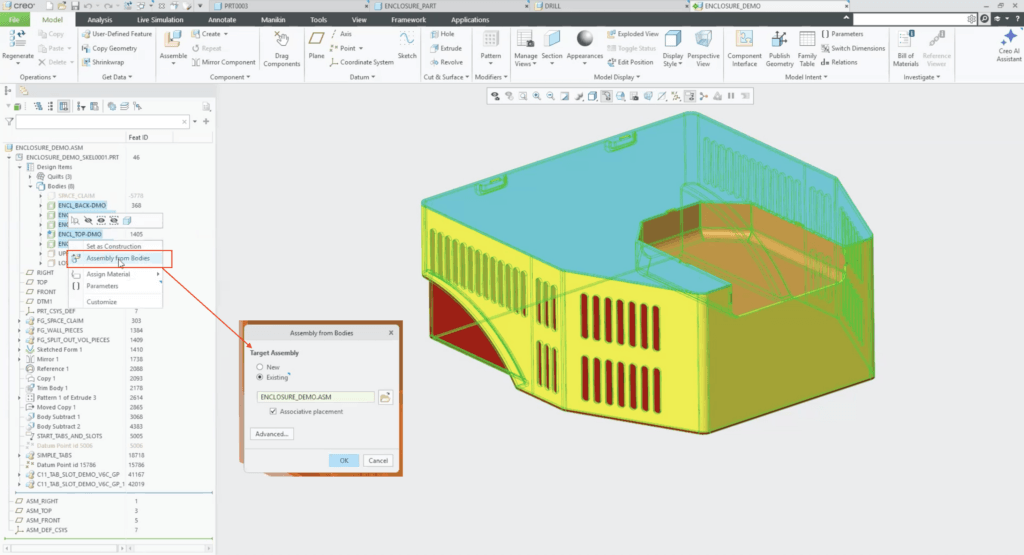
How to Create Assembly Parts from Bodies:
- Open the multi-body part containing your master or skeleton geometry.
- Select the bodies you want to convert.
- Choose ‘assembly from Bodies’.
- Select ‘new’ or ‘existing’ assembly.
- Confirm the operation.
Creo 13 makes it easy to create the individual parts and place them into the selected assembly, reducing the manual work required to transition from master modeling to a production assembly.
Creo 13 Tutorial: Creating Patterns Along a 3D Curve
In older versions of Creo, creating repeated geometry across a complex curved surface required extra setup. The new 3D curve pattern capability makes that workflow more direct by letting users select a curve chain, choose options to follow curves and surface directions, and use alternate origins. This means that a feature can now follow a chain of curves or edges, including a 3D curve positioned on a complex surface.

How to Create a 3D Curve Pattern:
- Create the feature you want to repeat.
- Create or select the 3D curve that defines the path.
- Start the ‘Pattern’ command and choose the option to pattern along a chain of curves or edges.
- Select the curve, define the starting point, and specify the number of pattern instances.
- Adjust orientation settings depending on whether the features should follow the changing surface direction.
The new 3D curve pattern features mean a design feature can now follow a chain of curves or edges, including a 3D curve positioned on a complex surface.
Should You Upgrade to Creo 13?
These enhancements are only a portion of what Creo 13 includes, but they highlight a clear theme: reducing friction in everyday engineering work.
AI guidance can help users find answers faster. New performance reporting makes large assemblies easier to diagnose. Multi-body and 3D curve improvements simplify previously cumbersome modeling tasks.
For engineering teams evaluating the Creo 13 updates, the best next step is to review the workflows your users repeat most often and see where these improvements could eliminate steps, shorten troubleshooting, or make complex models easier to manage.
If you are new to Creo and want to get started, or are a long-time user ready to upgrade, just contact us to get started.
